There are three
ways to build a retaining
wall
that have been proved over time to work and
survive
lots of freezing and thawing! |
|
|
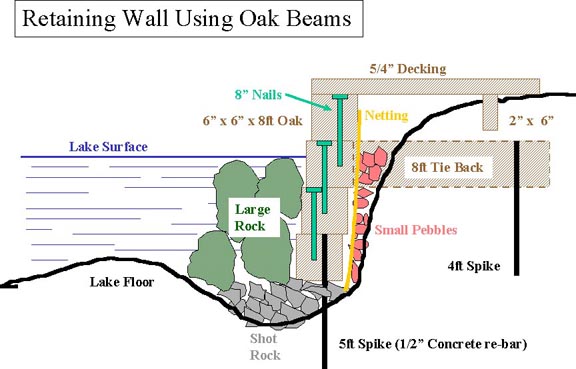 |
This
MUST be built with oak, NOT pressure treated lumber. Pressure
treated lumber
contains toxic materials which can damage fish etc.
Netting is MOST important to prevent wave action from erroding behind
the wall.
Advantages:
Looks nice. Uniform height.
With
decking, easy to mow.
Disadvantages:
Somewhat expensive.
|
|
|
 |
Don’t use limestone, it breaks up from freezing.
Most contractors have broken concrete they are willing to
deliver for
free, but get it without re-inforcing rods.
Advantages:
Inexpensive.
Disadvantages:
Labor intensive to install
Harder to mow
around.
Needs "weeding".
|
|
|
| Concrete
Blocks
This construction is essentially the same as
that for broken concrete.
|
Advantages:
Easy to stack.
Very neat
appearance.
Fairly easy to
mow.
Disadvantages:
Heavy to install.
Moderate cost.
|
HOW TO BUILD
Some lots had earth removed in front of the banks
using a back-hoe. This
created a "ditch" which fills up with silt. If this is your situation,
you
need to remove as much silt as possible, then fill the trench with
compacted
shot rock to create a level and stable foundation.
If your shore line is firm, you can build directly on
the un-disturbed
base.
OAK WALL
1. Deposit shot rock and compact if there is a trench
in front of the
bank.
2. Place first layer of 6 x 6 oak.
3. Drill holes and drive 5ft spikes (½" concrete re-bar) every 6ft of
length.
4. Lay additional layer. Each secured by 8" nails.
5. Tie-backs, 8ft by 6" x 6" must be used at 10ft intervals. These are
secured
by spikes. These stop the wall from tilting forward.
6. Place garden netting behind the wall This is the weed preventing
roll
material. Fiber glass preferred. Otherwise fine woven plastic. Water
driven
under wave action squirts between the features of the wall and erodes
the
earth behind it. This screen prevents that from occurring.
7. Small pebbles are essential behind the screen. These MUST extend
above
the lake level.
8. Place large rocks against the lake-side face of the wall up to the
lake
level.
9. Decking is optional.
CONCRETE WALL
1. Establish a firm base. If there is a trench or
silt, scoop out and
deposit shot rock.
2. If the lake floor is firm. Place the first line of broken concrete.
These
should be large pieces at least 2 x 1ft . Place at an angle towards the
bank
at 15°.
3. Continue stacking and inter-locking.
4. Place netting behind the wall.
5. Back fill with small stones or gravel. These must extend above the
lake
level.